OpenBP

Lockdown got you down?
Many of us have been under lockdown for several weeks now and many of you are probably itching to get back in the sky.
However, if you’re looking for a project to help you pass the time and learn something new, we’ve got something for you!
Announcing OpenBP – Open Brilliant Pebbles!
We are releasing an open version of the Brilliant Pebbles firmware and some documentation on the hardware to help you turn it into your very own device! With a barometer, piezo speaker, a battery and charging circuit you can turn it into a paragliding vario, a weather sensor, a generic timer, or whatever you want!
Please note – uploading another firmware to your Brilliant Pebble will stop it working with the Android and computer apps. We have a section at the bottom of this page that shows how to restore original functionality to your device, but do this at your own risk! We cannot accept any responsibility for any consequences of tinkering with your audible. We recommend this for advanced users only.
Getting Started
Install Arduino IDE
To install the Arduino IDE, download the software from the Arduino website and follow the installation instructions:
Installing core
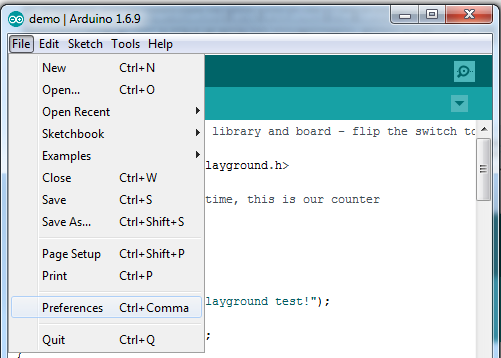
Once the Arduino IDE is installed, open the Preferences from the File Menu:
In the “Additional Boards Manager URLs” option, paste the following:
https://adafruit.github.io/arduino-board-index/package_adafruit_index.json
The list of URLs is comma separated, and you will only have to add each URL once.
Once the URL is added, open the Boards Manager by navigating to the Tools->Board menu. Search for Adafruit AVR Boards and install the package. Once installed, restart the Arduino IDE.
Installing libraries
The Adafruit BMP280 driver is also needed, and you can install it via the Library Manager in Sketch -> Include Library -> Library Manager.
Run a test sketch
Blinking an LED
The very first sketch you can run is blinking an LED. In the Arduino IDE, replace the code with the following:
#define RED_LED 8

#define BLUE_LED 9

#define POWER_PIN 6

//

void setup() {

// put your setup code here, to run once:

pinMode(POWER_PIN,INPUT);

pinMode(BLUE_LED,OUTPUT);

pinMode(RED_LED,OUTPUT);

digitalWrite(BLUE_LED,LOW); //start with both LEDs off

digitalWrite(RED_LED, LOW);

}

//

void loop() {

// put your main code here, to run repeatedly:

digitalWrite(RED_LED, HIGH); //turn on red LED

delay(500); //wait 500 milliseconds

digitalWrite(RED_LED, LOW); //turn off red LED

delay(500);

}
plug in your Brilliant Pebble, the select its port via Tools -> Port.
Select the board type in Tools -> Board to: Adafruit Feather 32u4
Click Upload, and the sketch should be flashed to the Brilliant Pebble. The red LED should now be blinking once per second!
Hardware Details
| Feature | Pin | notes |
| Red LED | 8 | use digitalWrite() to turn on or off |
| Blue LED | 9 | use digitalWrite() to turn on or off |
| Speaker1 | 4 | send square wave between 1-5 kHz |
| Speaker2 | 5 | only on old version of Brilliant Pebbles |
| Power Pin | 6 | holding LOW for several seconds will turn device off |
| Battery level | A10 | use analogRead() to get voltage/2 |
Controlling the LEDs
To turn on the Red LED for example, simply add
digitalWrite(8,HIGH);
To the desired location in the code.
Turning off using the microcontroller
You can turn the device off through code by holding pin 6 LOW for several seconds. An example sketch turns on the red LED, then after 10 seconds starts the device shutdown sequence:
#define RED_LED 8

#define BLUE_LED 9

#define POWER_PIN 6

//

void setup() {

// put your setup code here, to run once:

pinMode(POWER_PIN,INPUT);

pinMode(BLUE_LED,OUTPUT);

pinMode(RED_LED,OUTPUT);

digitalWrite(BLUE_LED,LOW);

digitalWrite(RED_LED, HIGH); //turn on red LED

//

delay(10000); //wait 10 seconds

pinMode(POWER_PIN, OUTPUT);

digitalWrite(POWER_PIN,LOW); //set pin to LOW until device turns off

}

//

void loop() {

// put your main code here, to run repeatedly:

}
Note that you need to set pinMode to INPUT during normal operation, then set pinMode to OUTPUT on the power pin if you want to shut down the device.
Reading the battery voltage
The battery of the Brilliant Pebbles is connected via a voltage divider to analog pin A10. To get the voltage reading of the battery, use analogRead, then divide by 1024 and multiply by the reference voltage of 3.3 volts:
int adcValue = analogRead(A10);

float batteryVoltage = ((float) adcValue)/1024.0*2*3.3;
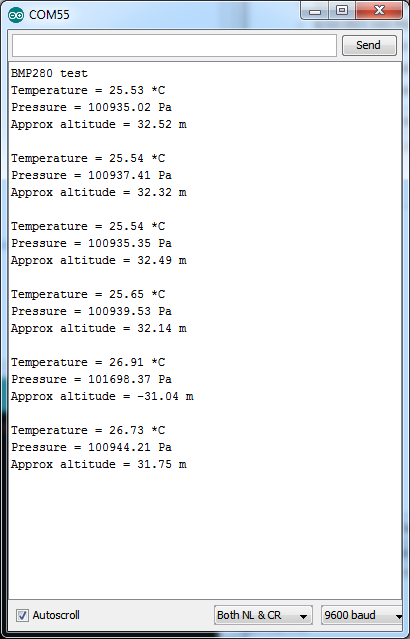
Using the barometer
The Adafruit BMP280 demo sketch should work with only a minor change: when calling bmp.begin():
bmp.begin(0x76, 0x58);
Once the sketch is loaded, Opening the Serial Monitor should show the following:
Playing a tone on the speaker
To play a tone on the speaker, you can use the Arduino Tone() library, or manually toggle the speaker pin (pin 4).
Below is a short sketch to play a short beep on the Brilliant Pebble:
#define RED_LED 8

#define BLUE_LED 9

#define speakerOut 4

#define speakerOut2 5

#define POWER_PIN 6

//

void setup() {

// put your setup code here, to run once:

pinMode(POWER_PIN,INPUT);

pinMode(BLUE_LED,OUTPUT);

pinMode(RED_LED,OUTPUT);

digitalWrite(BLUE_LED,LOW);

digitalWrite(RED_LED, LOW);

pinMode(speakerOut,OUTPUT);

//

int beepLength = 210;

int duration = 210;

int pauselength = 70;

int pulseLength = 126;

//

//

int start = millis();

while (millis()-start < duration) {

for (int i=0; i<beepLength; i++) {

// UP

digitalWrite(speakerOut,HIGH);

delayMicroseconds(pulseLength);

// DOWN

digitalWrite(speakerOut, LOW);

delayMicroseconds(pulseLength);

}

delay(pauselength);

}

}

//

void loop() {

}
Restoring the original firmware
First, install the Arduino Leonardo uploader: https://github.com/vanbwodonk/leonardoUploader
Then, download the latest official Brilliant Pebbles firmware: www.aon2.co.uk/files/brilliant_pebbles_bf01d633.hex
Use the Arduino Leonardo uploader to flash the firmware into the Brilliant Pebble:
leonardoUploader [PORT] [FILE.hex]
For example, on Windows, if the Brilliant Pebble is on COM10:
leonardoUploader COM10 brilliant_pebbles_bf01d633.hexSource code of a basic audible altimeter
Download a fully-functioning but basic audible altimeter firmware from our new Github page!
To make the code as easy to understand as possible, we have removed a lot of features from the example firmware. However, you can set yourself a challenge and add them back in with the information we’ve provided! The example firmware:
- alarms are in metres
- alarms are hard-coded in the firmware
- this does not communicate with the official Brilliant Pebbles Android app or computer app
- this does not have the “auto-off” function after 16 hours (see “turning off the device” section above for how to do it)
- no hard deck alarms
- no altitude offset
- battery life is shorter than the official firmware (this is because the low power library is quite risky and users might brick their device if not used correctly)
- climb detection algorithm is also much more simplified (compared to official firmware)